Have you ever looked at your home lighting and wished for something more unique without spending a fortune? Making a chandelier from a glass bowl might be the perfect DIY project for you. This fun and creative project allows you to put a personal stamp on your home decor, crafting a piece that’s as functional as stylish.

Imagine the satisfaction of illuminating your dining room, living room, or even your entryway with a light fixture you made yourself! Not only will you create a beautiful, customized chandelier, but you’ll also gain a sense of accomplishment and maybe even a few bragging rights.
The process is surprisingly straightforward, and with a bit of patience and the right materials, you can create a piece that will impress anyone who sees it.
It’s an excellent project for those looking to dip their toes into DIY home improvements without diving into something too complex.
Plus, it offers a great opportunity to recycle and repurpose materials, making it an eco-friendly choice as well.
Whether you’re a seasoned DIY enthusiast or a complete beginner, this project is designed to be approachable and enjoyable.
So, let’s transform that ordinary glass bowl into a stunning chandelier that reflects your unique style and creativity.
Project Map
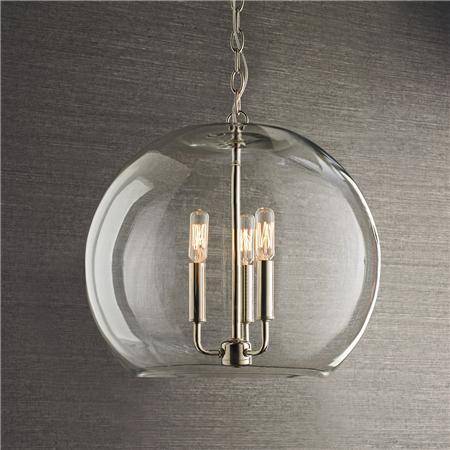
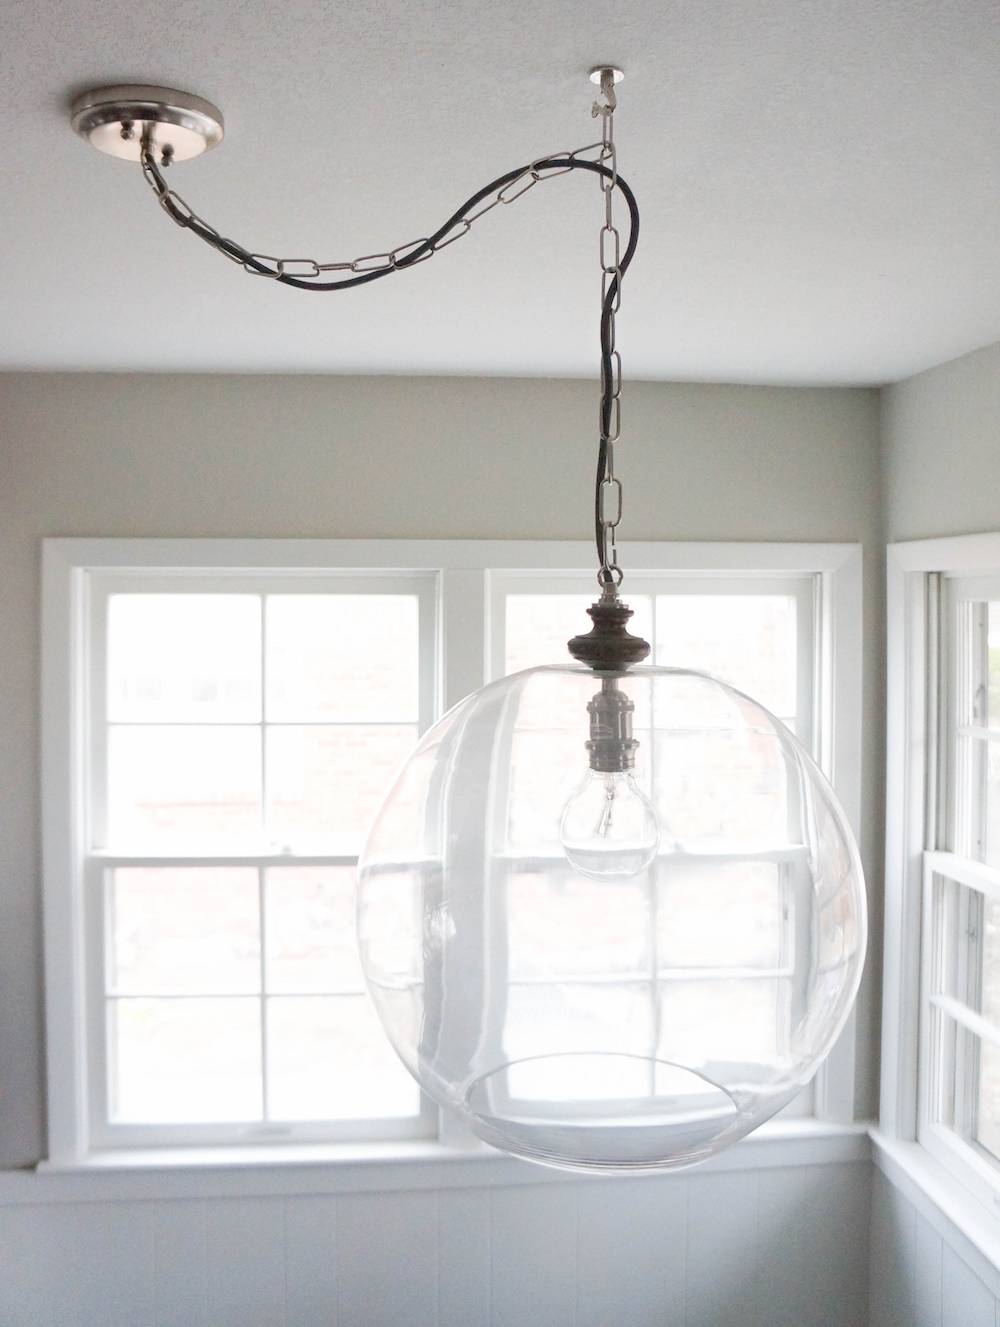
The homeowner wanted something like the above fixture for her new kitchen. She didn’t like the price tag, do we decided to DIY it. Here is how…
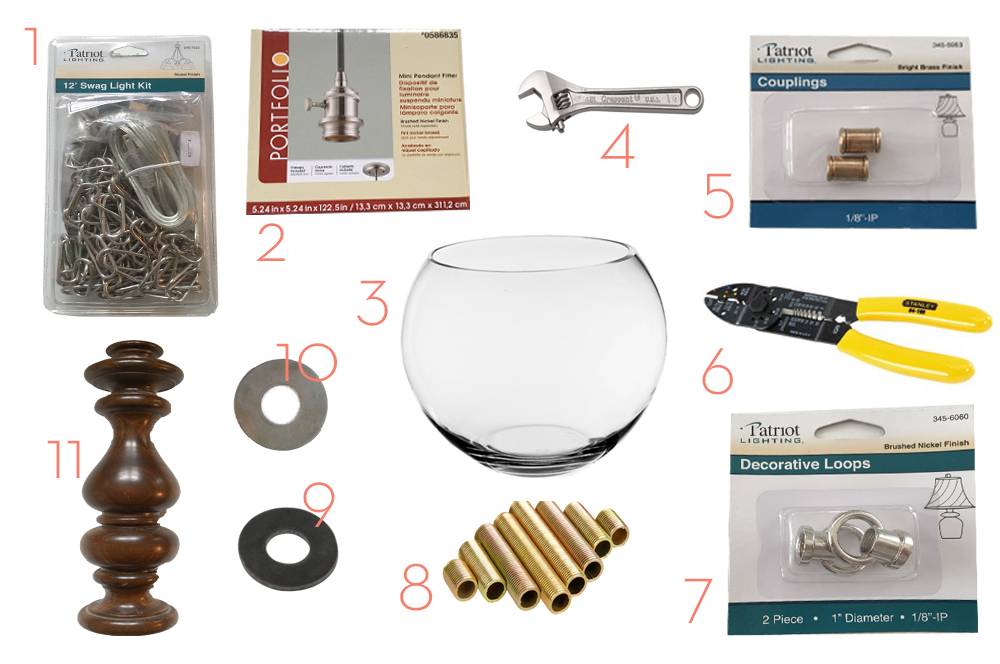
Materials and Tools Needed
1. Swag Kit: Our light fixture was not centered on the table, so we needed a swag kit.
If your light fixture is centered, you don’t need the swag kit. You just need to buy the chain.
They sell this separately. The swag kit was on sale and, therefore, was cheaper than a swag hook and chain sold separately, but you could also simply buy a swag hook and a chain not in the kit.
They sell these at any home improvement store in the lighting section.
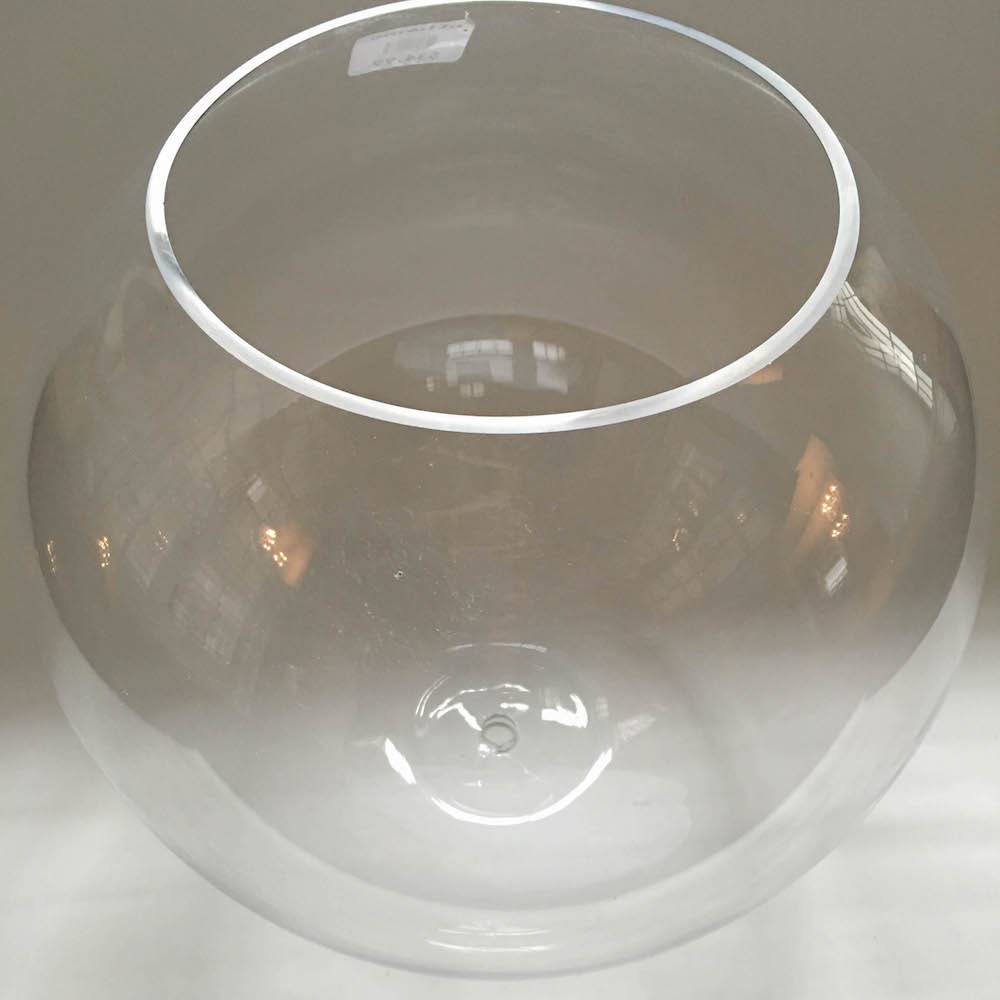
3. Large Glass Bowl (At Home Decor): It varies where I get my glass bowls for fixtures.
TJmaxx/Homegoods has great options.
Sometimes, you can score one at an Estate Sales or Thrift Stores.
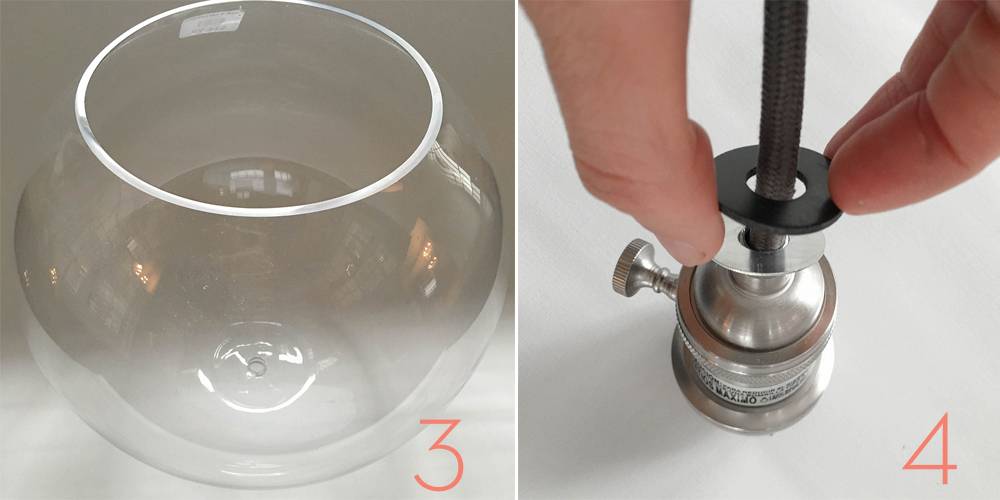
We wanted a huge orb bowl, so I found this one at At Home Decor. Glass bowls come in a variety of styles so choose one that fits your style.
Important: A hole will be drilled in the bottom of this bowl, so make sure the glass is thick enough. If the glass is thin, then the bowl will break. My bowl was thinner at the opening but the bottom was good and thick.
4.Crescent Wrench: for tightening the nuts onto the threaded lamp pipes.
5. Two couplings: It doesn’t matter what finish these are. These won’t be seen.
6. Wire Stripper: You will need this to attach to cut the pendant cord to size and attach the fixture.
7. Two Decorative Loops : These will be seen so get them in the finish you want.
8. Lamp Pipes: Its easiest to get the variety, so you switch them out if you need different sizes.
9. Two Rubber Washers ( The inside opening should be a larger opening than the diameter of threaded lamp pipe with coupling attached, but smaller or same size opening than your decorative loops.)
10. One or two metal washers: (The inside opening should be a larger opening than the diameter of the threaded lamp pipe with coupling attached, but smaller or same size opening than your decorative loop) I only needed one (see #11) but no matter what these will be seen so buy them or paint them the finish of your fixture.
11. Lamp Shaft (optional): I had an old thrift store lamp shaft that I wanted to add to the fixture. I took apart the lamp and pulled this off.
It is solid wood. I planned to cut it.
The great thing about a lamp shaft is it has a hole through the middle. You could easily use a decorative finial or even small furniture leg for this.
If you do, you will need to drill a hole through the middle. If you don’t want to do this and want a more minimal look, then a second metal washer would work.
Step-by-Step Guide to Creating the Chandelier
First Things First….. Your glass bowl needs a 3/4 inch hole at the bottom.
Scary DIY right?
While there are many tutorials out there to do it, my favorite being from Mandi from Vintage Revivals, I still don’t do it.
I have visions of a breaking bowl or bloody hand.
So I always buy my bowl and drive right down to my local glass cutting shop.
It cost $20 to have a hole drilled by the shop in my city.
That is worth it to me.
Once this is done and picked up you are ready to put it together.
Step 1
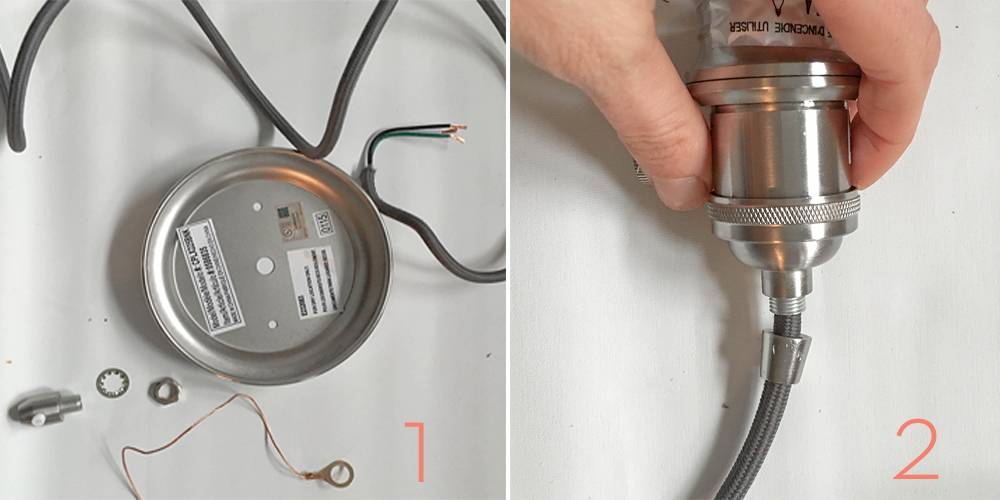
Take the Pendant kit and take the ceiling mount (the part you attach to the ceiling) apart to free the cord.
I always take a picture of something together so I can remember how it goes.
Put aside the instructions for later. You will use install the light fixture per the pendant kit instructions.
Note: See the part farthest to the left of picture #1. You use it to tighten the white screw to keep the cord in place. Since I used a swag kit, I didn’t need this. If you don’t use a swag kit, then you will need this. I will explain how later.
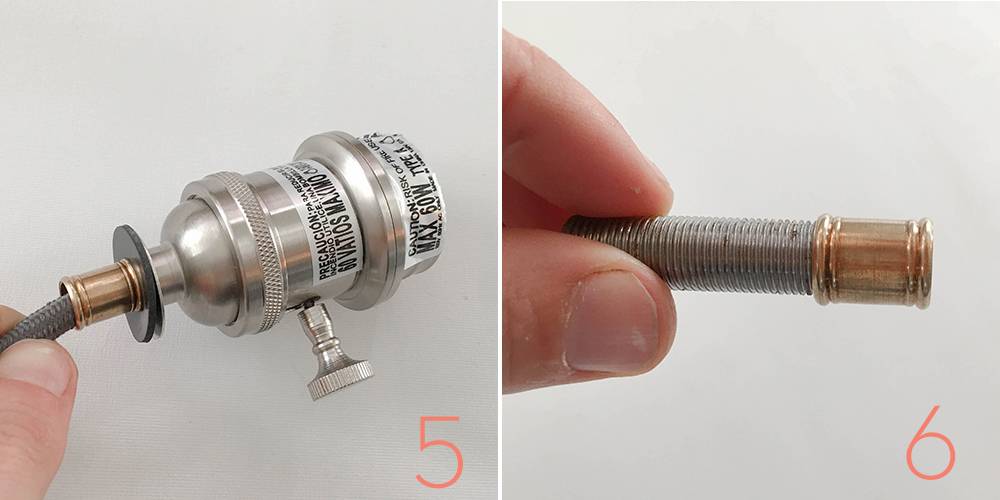
Step 2
Remove the decorative nut from the top part of the light socket.
This will expose an attached threaded pipe that you will use in step 5.
Step 3
Take your glass bowl and set it aside. You will start attching things to it.
Step 4
Add the metal washer first, and then add the rubber washer.
Do not skip the rubber washer step.
You will tighten things to make the fixture sturdy, and the rubber washer protects the bowl from cracking.
Step 5
Attach one of your couplings to the attached threaded pipe.
Your washer and rubber washer will now be between the coupling and the socket.
Step 6
Attach one of your threaded pipes to your second coupling.
The end in my hand will go into the coupling you attached in step 5.
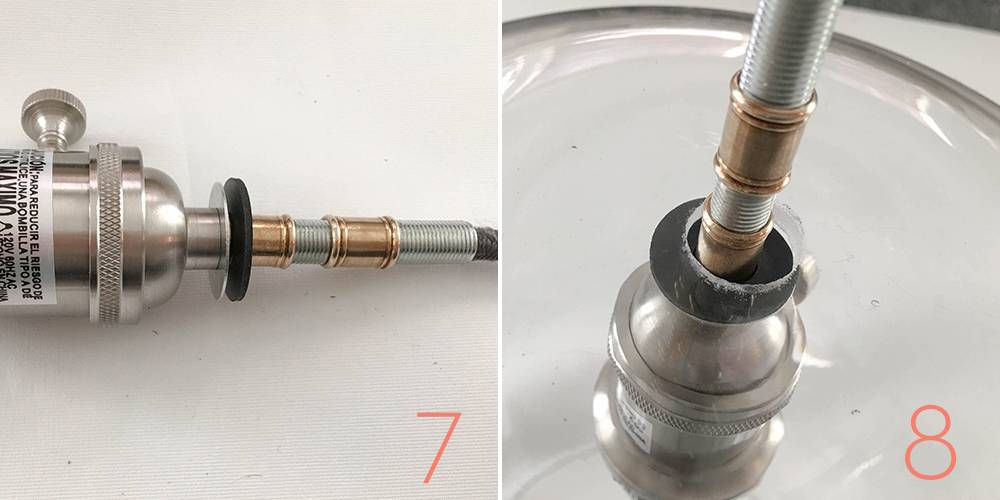
Step 7
Attach the threaded pipe to the first coupling. This picture is to show you the end product.
It might be not very clear because the picture in step 6 shows the coupling at the opposite end. At this point, I twisted the coupling down so that there would be enough threaded pipe exposed for step 9.
Step 8
Insert the tight socket through the bottom of the bowl. (The bowl is upside down of course) Notice the rubber washer is the part that is up against the glass.
Important: From here on out, you might need an extra set of hands. You can do it with one person, but it’s so much easier with two.
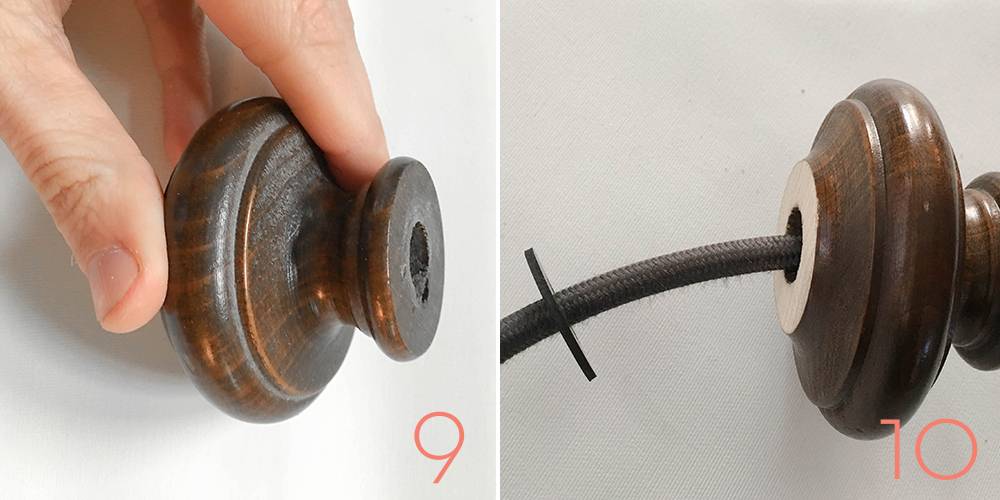
Step 9
I cut the lamp shaft down at the top.
I did this so there would not be cut wood showing that I would have to stain.
This is where you could use a finial or furniture leg.
Make sure you have drilled the hole and stained it before this step.
Again, I didn’t have to drill a hole because my $2 thrift store find, a shaft from a broken lamp, already had one.
If you do need to drill a hole, drill one the size of your washer hole.
You can skip step nine if you don’t want to use a decorative finial. In steps 10-11, replace the wooden part with a metal washer.
Step 10
Note: The cord on the left side of the picture is coming from the glass bowl. The right side will be the part of the cord/chain that goes to the ceiling.
Next, attach your second rubber washer. This will be pressed against the bowl outside (between the finial and the glass). Now attach your decorative finial or second washer.
Step 11
This should be how your fixture should be looking. It’s not secure at this point.
It is only secure in the picture because I am holding up the cord. If you can’t tell, the socket is inside the bowl.
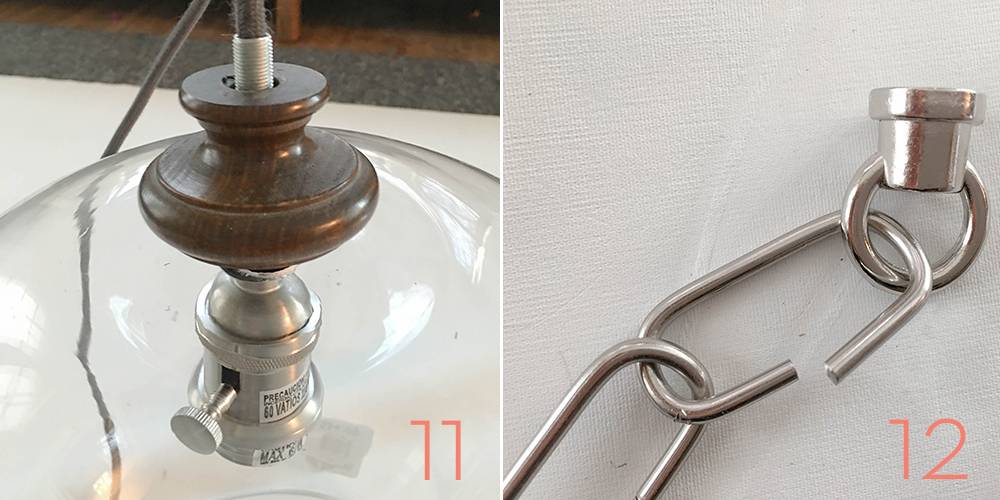
Step 12
Attach your chain to one of your decorative loops. I always use pliers for this. Before I started the DIY, I installed the swag hook into the ceiling, which allowed me to determine how much chain and cord I needed.
However, you can do this even if you don’t need a swag hook. Just measure the amount of chain you need for your desired height.
Tip: I typically like to hang a dining room table fixture 33-36 from the top of a table. So the distance between the bottom of the bowl to the table is 33-36 inches.
Step 13
Attach the the decorative loop to the exposed threaded pipe coming up through the finial/washer.
Note: I had to problem solve a little. I had too much threaded pipe exposed that the decorative loop didn’t tighten down all the parts together. I fixed the problem by going back to the store and getting two more washers.
I bought two different sizes of thicker washers to make it look more decorative.
I placed them in between the finial and the decorative loop. You could also problem solve by taking the fixture apart to step 6 and use a smaller threaded pipe.
Use pliers to close the chain shut (not pictured).
I also covered the bowl with some bubble wrap while I did this. Or, you could be extra careful and attach the chain to the loop before you screw it on the lamp pipe.
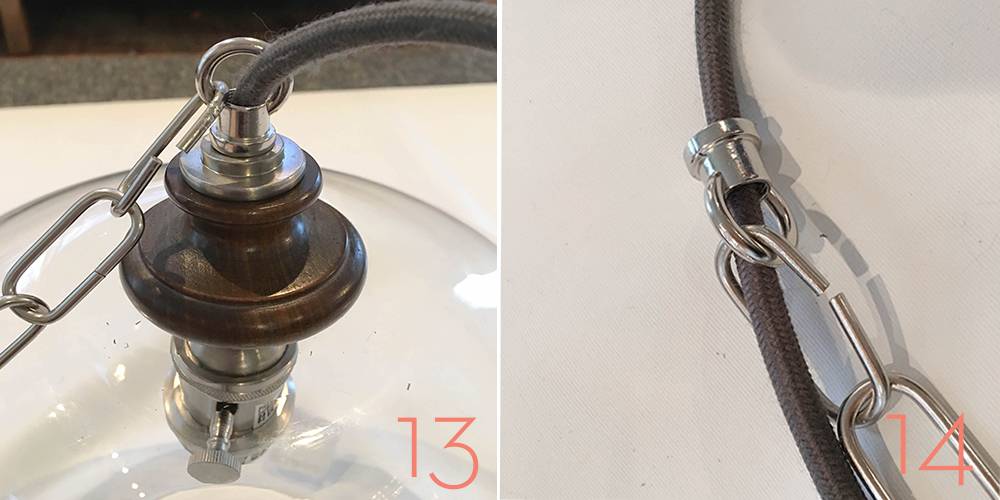
Step 14
Intertwine cord between the chains. I did every four chains. After I got the fixture up, I wished I had done every two or three.

Step 15
Thread a small lamp pipe through your second coupling and attach it to the end of the chain. (This is why you need to measure your chain before you DIY) Thread the end of the cord, after its been intertwined in the chain, through the second coupling/ lamp pipe.
Step 16
Now it’s time to get it ready to install. I
nsert the exposed pipe through the ceiling mount.
First, thread the jagged washer, then the grounding wire, and then (not pictured) secure it with a nut. Tighten with your crescent wrench.
The nut, the jagged washer, and the grounding wire come with the pendant kit. You don’t need to purchase them.
I am going to insert picture #1 again so you can see it. Skip this part if you are using a swag kit.
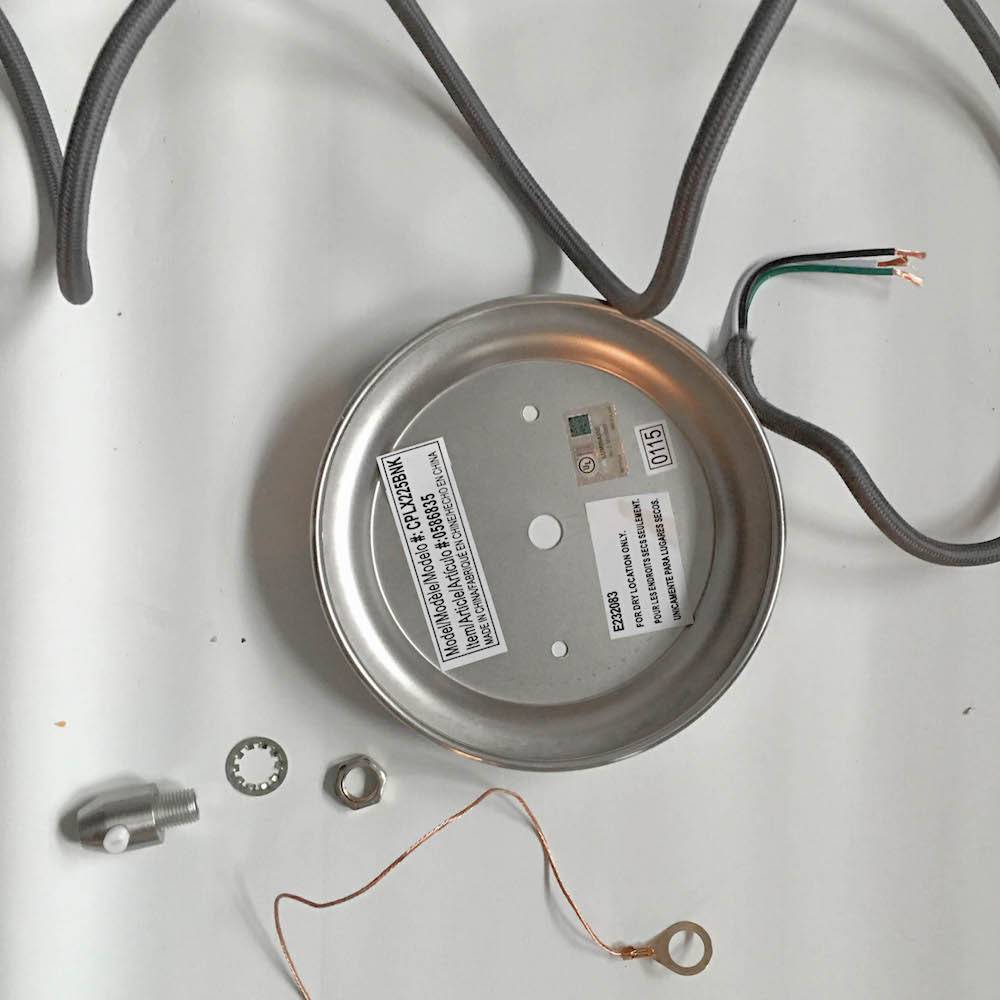
See the little part on the far left.
If you are not using a swag kit, install this on the threaded pipe attached to the second decorative coupling. (see Step 15).
Thread your cord through it and screw it down over the lamp pipe until it is touching the bottom of the decorative coupling.
There is no thread on the bottom part, so it will be loose. Don’t worry about this. Once you do step 16 and tighten it will be secure.
You can see it has an attached threaded pipe. This is what goes through the ceiling mount.
Once you have done this, do step 16. Finally, screw the white side screw so it will clamp down on the grey light cord. Now you are ready to install. Again, this only concerns you if you are not using a swag hook.
Step 17
Grab those pendant kit instructions and install your fixture according to them. You need a second person for this.
If you are not comfortable with this…call an electrician.
Tip: If you are using a swag kit, hang the fixture on it first, and it will hold the chandelier there while you easily install the wires and ceiling mount to the lightbox.
Project Instruction Card
DIY Glass Bowl Chandelier
Create a stunning glass bowl chandelier with this easy DIY guide! Transform a simple glass bowl into a stylish light fixture for your home.
Materials
- Swag Kit (or a swag hook and chain if needed)
- Portfolio Mini Pendant Kit
- Large Glass Bowl (thick enough to drill a hole in the bottom)
- Crescent Wrench
- Two Couplings
- Wire Stripper
- Two Decorative Loops (in desired finish)
- Lamp Pipes (variety pack recommended)
- Two Rubber Washers
- One or Two Metal Washers (match fixture finish)
- Lamp Shaft (optional)
Instructions
- Prepare the Pendant Kit – Disassemble the ceiling mount to free the cord. Keep the instructions for later installation.
- Remove Decorative Nut – Unscrew the decorative nut from the light socket to expose the threaded pipe.
- Prepare the Glass Bowl – Set the bowl aside; you’ll attach components to it.
- Add Washers – Place a metal washer first, then a rubber washer on the bowl to prevent cracking.
- Attach First Coupling – Secure the coupling to the threaded pipe, sandwiching the washers between it and the socket.
- Attach Threaded Pipe – Connect a threaded pipe to the second coupling.
- Secure Threaded Pipe – Attach the pipe to the first coupling, ensuring enough threading is exposed for later steps.
- Insert Socket Through Bowl – With the bowl upside down, insert the socket so the rubber washer touches the glass.
- Optional Finial or Washer – If using a decorative finial, prepare and stain it beforehand. If not, use a metal washer instead.
- Secure the Outside of the Bowl – Add a second rubber washer between the finial (or washer) and the glass.
- Check Fixture Assembly – Ensure all parts are in place, though not yet fully secured.
- Attach Chain – Connect the chain to the decorative loop, measuring for the desired hanging height.
- Secure Decorative Loop – Attach the decorative loop to the exposed threaded pipe, using additional washers if needed.
- Intertwine Cord – Weave the cord through the chain, spacing every two to four links.
- Thread Lamp Pipe – Pass the cord through a small lamp pipe and attach it to the chain’s end.
- Prepare for Ceiling Mounting – Thread the exposed pipe through the ceiling mount, securing it with the jagged washer, grounding wire, and nut. Tighten with a wrench.
- Install the Fixture – Follow the pendant kit instructions to complete the installation. Use a second person or hire an electrician if needed.
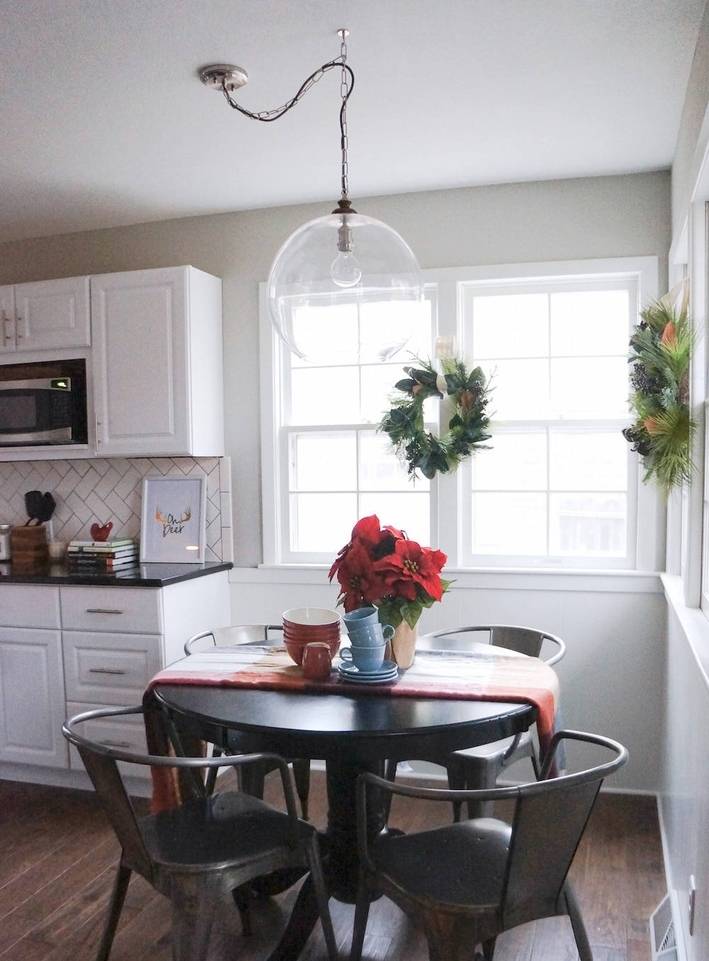
The Reveal: Glass Bowl Chandelier
I love the brightness and simplicity of this fixture. I added a round vintage bulb and called it a day.

I like the extra detail the finial gives to the fixture even though it is not needed in the function.

I love the finished product. The table is a 40-inch diameter table.
I think two of these hung over a rectangular table would look great. You could also do the same project with smaller bowls to get pendant lights for a stylish addition to your bar or island counter area.
The inspiration fixture was $299. The costs for the parts, bowl, and hole drilling was a total of $80. Gotta love that price savings right?
Do you recognize this kitchen? Check out the renovation details here. Happy New Year!
The insight to do this was amazing. It definitely shows that you can do almost anything for your home just by thinking of the idea and see if it works. DIY is definitely something to think about. Very creative and just think that you could use other colorful bowls in its place. Thanks for sharing.