If you live in a small space, it can be tough to find a spot for a Christmas tree. In my urban apartment, it’s impossible to display one, let alone make space to store it the other eleven months of the year. But this year, I was determined to find a small tabletop solution, and while I was at the craft store, it hit me: a reusable dowel rod tree that could be folded up and easily packed away flat. So, I grabbed my Dremel tools, and I was off.
 The process is pretty simple, and the result is just so darn festive. It’s got a natural, Scandinavian vibe that works so well around the holidays. Round ornaments look nice, or you could wrap a garland around it. String lights would look lovely too!
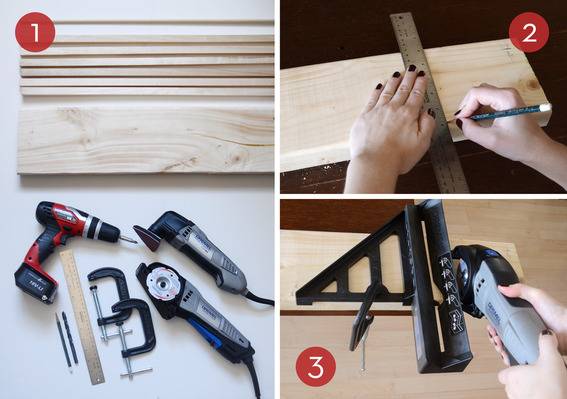
1. Here are the materials that you’ll need for this project:
- Dremel Multi-Max with included Sanding Accessory 70W
- Dremel Saw-Max andSM600 Multi-Purpose Flush Cut Wheel
- Cordless drill and bits:
- 11/32″ drill bit
- 5/16″ drill bit
- Clamps
- Ruler and pencil
- Wood glue
- (1) 5/16″ round wooden dowel
- (7) 5/8″ square wooden dowels
- Scrap wood, at least 5″ wide (I used a 2×6)
- Safety glasses
2. Begin by creating a square base for your tree. Measure a 5″ square piece and mark off a guide line using your ruler and pencil.
3. Place the miter guide that comes with the Saw-Max on the wood and clamp it to your work surface at the point shown above. Put your safety glasses on, and use the Dremel Saw-Max with a Dremel SM600 Wood & Plastic Flush-Cutting Wheel to cut a 5″ square from your scrap wood.
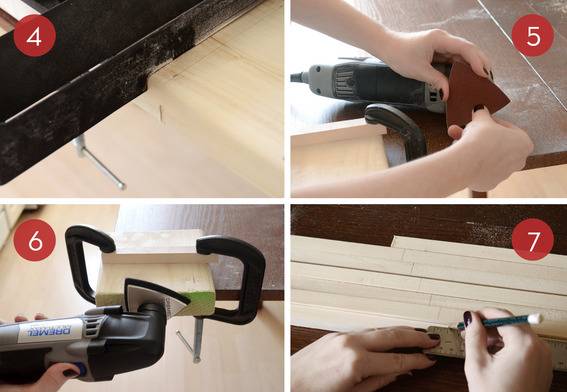
4. If your wood was thick like mine, you’ll need to cut halfway through and then flip the piece over and cut the rest of the way through. Be sure to measure carefully here.
5. Next, get out your Dremel Multi-Max. Attach the sanding accessory, along with a coarse sanding pad
6. Be sure to place a piece of scrap wood on top of your base before you clamp it to the table, or else you may end up with round clamp marks on your wood. Sand the wood until it’s shaped, then switch to a fine sandpaper until the base is completely smooth.
7. Now you’ll begin measuring your square dowel rods. The first piece should be 14 inches long, and each subsequent piece 3/4″ shorter.
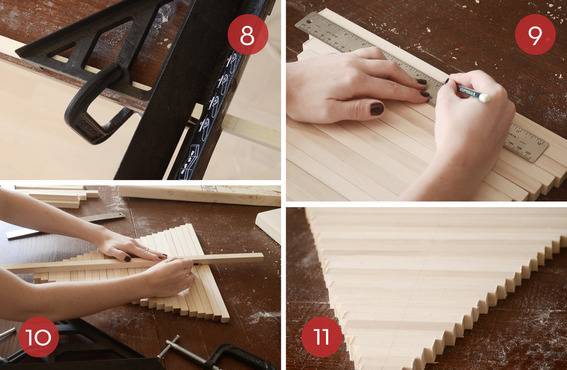
8. Use the Saw-Max miter guide and a clamp to attach one of the dowels to your work surface, and cut along your marked guide line. Do this for all the remaining pieces, continuing to create dowels that are 3/4″ shorter than the previous one until you’ve cut your last one, which will be 1 1/2″ long.
9. Once you have finished cutting all of your square dowel rods, lay them out on the table in front of you in descending order. Mark off the center point of the longest rod using your ruler, and do the same for the shortest rod.
10. Make sure the rods are perfectly aligned as shown above. Draw a long guide line from the center point on the longest piece, to the center point on the shortest piece using a straight edge (I used one of the extra dowel rods).
11. It’ll look like the pictured numbered ’11’ above when they’re all lined up.
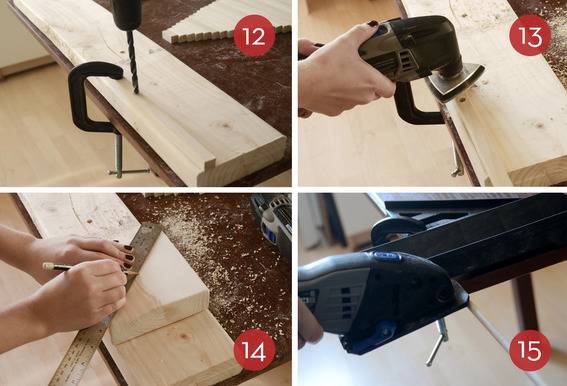
12. Now you’ll drill a hole through that center point of each dowel rod using your 11/32″ drill bit.
13. Once you have finished drilling all of the holes, sand each dowel, beginning with the coarsest sand paper and working down to the finest grit.
14. Now measure the center point of your base by using a ruler to find the center point of the diagonal. Use a 5/16″ drill bit to drill a hole halfway through the base. This is where the “trunk” of your tree will sit.
15. Now it’s time to cut the round dowel using the Saw-Max. It should be 2 1/2″ longer than the distance from the shortest square rod to the longest square rod.
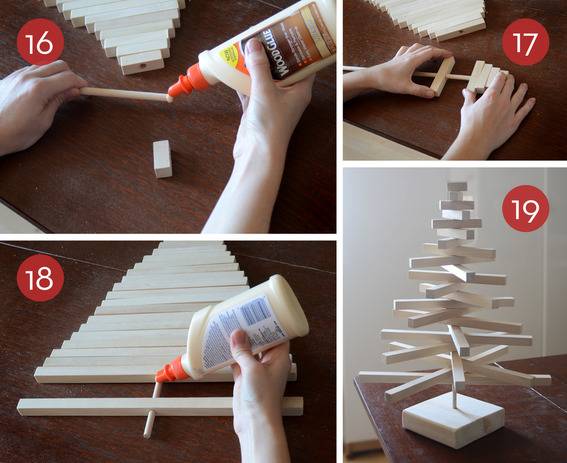
16. Put a drop of wood glue around the top edge of the dowel and secure the shortest piece over the glue. Wipe off any excess glue.
17. Now carefully slide all the remaining pieces onto the round rod. Do not glue these down.
18. The only other piece that will be glued is the longest one (which will be the bottom “branch” of the tree). Make sure to let the tree dry flat so that the top glued piece and the bottom one dry parallel to each other. This is important so that it will lie flat when you pack it away after the holidays.
19. Let the glue dry thoroughly, and then insert the round dowel into the base. Spin the inner dowels around… and your tree is finished!

This tree looks great with small one inch round decorative ornaments… make sure that they have string loops to hang them though, because those metal hooks won’t work very well on this tree. I swapped them out with bakers twine.

This is the ultimate Christmas tree for small spaces – it doesn’t take up much surface area, and it will pack flat so it won’t hog much of your precious closet space. You could even mount it on the wall if tabletop space is limited.

It would make a great centerpiece for your holiday table, too. Or a welcoming piece for your entryway. The possibilities are endless!
This post was sponsored by Dremel. All opinions are ours alone.
Looking for more seasonal DIY projects and ideas?

I made a version of this project a couple years ago on my blog based on the now relatively famous tree created by a Swedish designer and shortly after publishing, discovered that Lowe’s had published a similar tree on their website. The following Christmas – the trees appeared in Target!!! Obviously people love this idea and in this tutorial you have done a very nice job of describing the construction so that the tree is accessable to crafters with an interest in creating one of their own. They are indeed lovely little trees – I use mine as an advent tree – replacing tiny woven hearts with scandinavian ornaments as the season progresses. But I am loving your red balls as well! Very festive. I am told that a friend’s husband in Switzerland actually made one quite similar many long years ago out of driftwood. They still set it up and like you decorate with pretty red balls!
Such a cute tree! Thank you 🙂
Question: could you use a saw blade on the MultiMax instead of the SawMax?