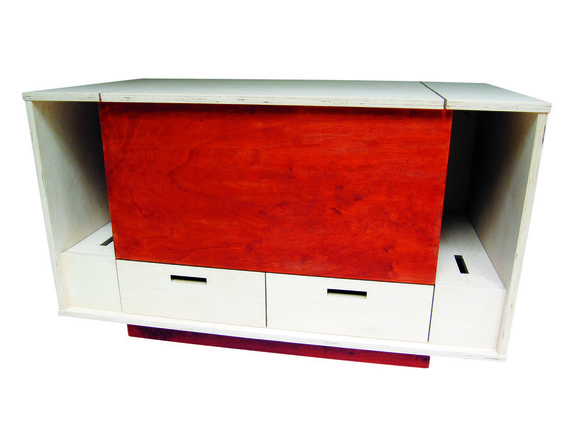
If you’ve ever dreamed of getting your house into Metropolitan Home or Architectural Digest but then screwed it all up by having kids, modBOX 2010 might just be your salvation. It is, in the words of its designer, “a modernist toy box for the hipster tyke.” Yet as cool as it looks on the outside, modBOX is all about the kid experience. It has a big catchall chest (perfect for emergency cleanups), plus two drawers that pull out, two book niches, and, best of all, two secret compartments. And if there’s anything a kid likes, it’s little, private places to put things. So even if you never see your living room featured in a shelter magazine, at least your hipster tyke can have an architect-designed toy box for hosting chic play dates.
Materials
- Two 5 x 5-foot sheets ¾” apple or Baltic birch plywood
- Finish materials (see steps 2 and 9)
- One 3 x 3-foot piece ½” apple or Baltic birch plywood
- Wood glue
- #20 biscuits (for joinery)
- Two torsion hinges (see step 6)
- Four metal corner braces with screws (for foot)
Tools
- Table saw
- Circular saw with straightedge guide (for crosscuts)
- Sandpaper
- Biscuit joiner
- Router and bits (for dadoes, pull holes, and hinge mortises)
- Clamps
- Drill
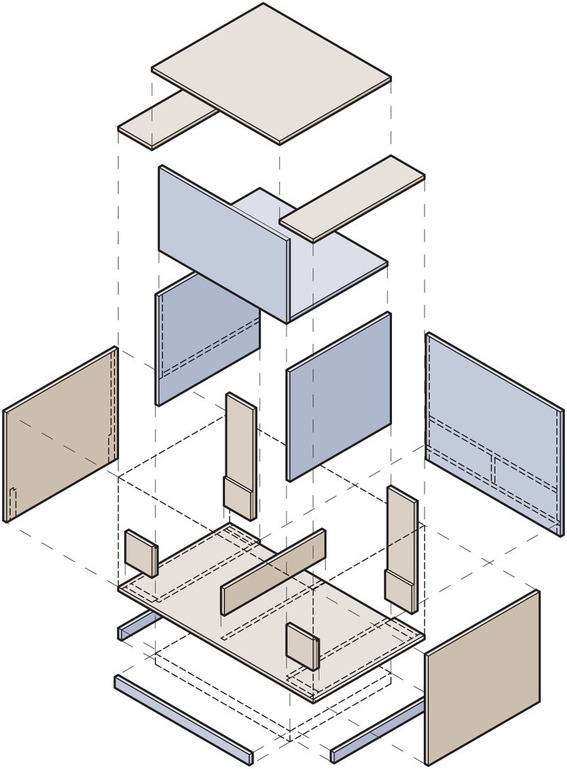
1. Cut the main box panels.
Following the plan illustrations, lay out and cut the following parts from ¾” plywood:
- Box bottom
- Niche sides (2)
- Niche backs (2)
- Compartment fronts (2)
- Niche tops (2)
- Chest sides (2)
- Chest back
- Chest front
- Chest base
- Center support
- Foot front
- Foot sides (2)
Label all the parts as shown in the plan and arrange them for easy reference. Sand all faces and edges smooth, and slightly ease any exposed corners; do not sand any edges that will join with other pieces (including butt/biscuit, dado, and rabbet joints).
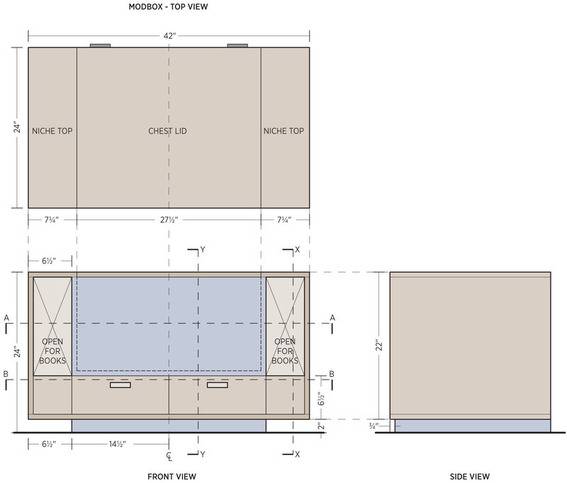
2. Finish the chest parts (optional).
To create the distinctive two-tone look of the project shown here, stain the parts of the chest and foot; these are indicated in the plan with dark gray coloring and include the chest sides, front, and back, as well as all foot pieces. Don’t stain any surfaces that will be joined with other parts.
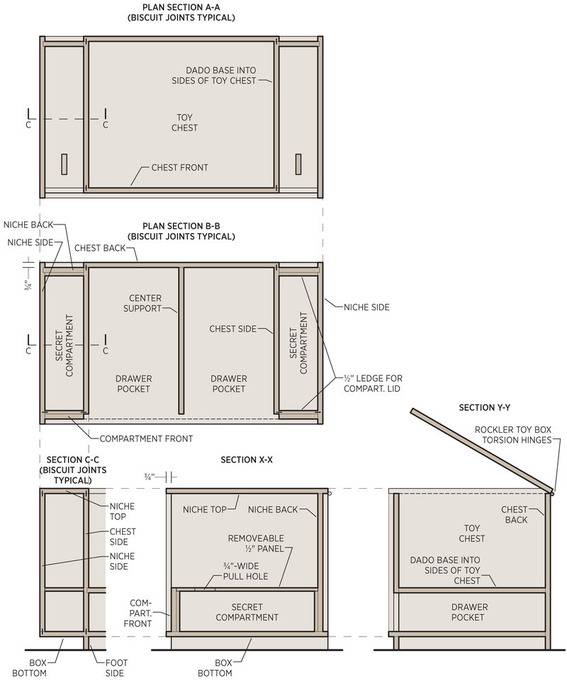
3. Prepare the joints.
Start laying out the project on the box bottom. Locate the chest sides first by drawing reference lines on the top face of the box bottom.
Cut the biscuit joints that will connect the box bottom to the niche sides and the chest sides, as shown in the plans. Also cut the biscuit joints that will connect the niche sides and chest sides to the niche tops.
Cut the biscuit joints between the center support (drawer divider) and box bottom, then cut the joints between the box bottom and the front foot piece.
At this point, the box bottom should have five lines of biscuit joints cut into its top face (parallel to the short side) and three biscuits (in one line) on its bottom face for the front of the foot (parallel to the long side).
Cut horizontal dadoes into the inside faces of the chest sides to receive the chest base. Cut vertical dadoes into the inside faces of the niche sides to receive the niche back pieces.
4. Prepare the compartment fronts and ledges.
Cut the four ledge pieces to size at 5¾” wide and 5½” tall
from ½” plywood; these will serve as ledges to support the compartment lids.
Cut biscuit joints between the ledges and the chest sides and niche sides. Glue one ledge to the inside face of each compartment front so their side and bottom edges are flush. Glue the remaining two ledges to the inside face of the niche backs so their inside and bottom edges are flush.
5. Glue up the main structure.
With all the dadoes and biscuit joints cut, you’re ready to dry-fit the complete chest and niche assemblies and the box bottom to make sure everything fits snugly and squarely.
Glue up the assemblies, starting with the niches (sides, backs, and compartment fronts) and the chest sides. Then glue the chest base into the dadoes on the chest sides. Glue the chest front and back to the chest sides, install the center support and box bottom, and add the foot front to the underside of the box bottom. Clamp the entire assembly and let the glue dry.
6. Mortise for the hinges.
The toy chest lid must have some type of safety hardware to hold the lid open and ensure that it closes slowly. For the project shown, both safety features are accomplished with torsion hinges (available from Rockler Woodworking Hardware; see
Resources).
Mortise the top edge of the chest back panel to receive the two hinges, so the lid will fit flush with all edges of the chest.
The hinge knuckles are fully exposed at the back of the lid (no
lid overlay).
7. Build the drawers.
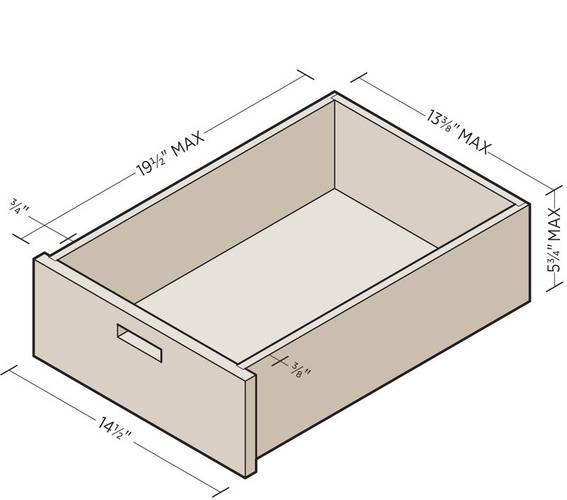
Measure the drawer pockets and front openings to verify all dimensions for the drawer boxes and fronts. Cut the side, back, and bottom pieces for each drawer from ½” plywood, as shown in the drawer plan. Cut the drawer fronts from ¾” plywood, then mill a ¾”-wide slot into each face to serve as a pull hole.
Glue up the drawers as shown in the plan, using dadoes for the front-side joints and rabbets for the side-back joints; the bottom should fit inside the box frame with dadoes or rabbets, as desired.
8. Complete the final details.
Measure and cut each compartment lid to fit its space, using ½” plywood. Mill a ¾”-wide slot into each lid, centered near the front, matching the pull holes in the drawer fronts.
Cut the chest lid to size, allowing for a small clearance at each side edge.
Use corner braces to attach the two side foot pieces to the foot front.
9. Finish the project.
Finish-sand all surfaces of the project, and slightly ease all edges and corners. Wipe all surfaces clean and finish the entire piece with the desired finish (clear polyurethane was used for the project shown).
Install the hinges and chest lid. Fit the drawers and compartment lids into place to complete the job.
Note: Mirror the plan below for left drawer; verify dimensions of finished drawer pocket.
Excerpted from PlyDesign (c) Philip Schmidt. Project design Stephen Ewoldt. Used with permission of Storey Publishing. Photos: ModBOX – (c) Steven Ewoldt
