Hi everyone, I’m so happy to be here at Curbly.com guest blogging about Hanukkah. I’m Sara of creativejewishmom.com, so if I can’t tell you about Hanukkah, who can? As I know from my own blogging experience, most of us love the chance to learn about cultures and customs that aren’t our own, so I hope that the information and ideas that I will be sharing here will be inspiring for everyone!
Before I get started with the crafty portion of this post, I should just give you a very quick and superficial background regarding the upcoming holiday. Hanukkah, (more correctly spelled Chanukah) which means “dedication” in Hebrew, celebrates the re-dedication of the Holy Temple in Jerusalem in 164 B.C. (That’s exactly 2,174 years ago!) The celebration lasts for eight nights to commemorate a miracle that occurred in the Temple: When the Jews first returned to their ravaged Holy Temple (after defeating the Greeks who had made it illegal for Jews to worship), they found only one unopened, and thus pure, vial of olive oil to light the Temple’s 7 branched golden menorah. While this vial was for only one day, miraculously, the flame remained lit for eight days and nights, allowing enough time to find more oil to sustain the light of the menorah. Hanukkah is about overcoming oppression, and the concept of every individual’s ability to rebuild themselves in the face of adversity. Deep? Yes, infact it is, and that is why the holiday has endured! You can certainly learn more from many many sources on the internet if you’re interested.
Because Hanukkah is just around the corner, starting this Wednesday night, I’m going to start with the most important element of the eight-day Hanukkah holiday, and that is the Hanukkiah! For the record, we really do not call it a Menorah, as the Menorah is the candelabra that was used in the Holy Temple, as I described above. Two different things, but I may have to use the words Hanukkah Menorah for the search engines, alack alas, if you know what I mean! In our family, our main Hanukkiah is a traditional silver one that holds cups for olive oil. We place wicks in the olive oil (there are several ways to do this) and light those wicks. Many choose to light candles, be we prefer to use olive oil for it’s pure light and direct connection to the original event in the Holy Temple. That said, my children certainly light Hanukkiahs with candles, and we make all kind of DIY Hanukkiahs for decoration. You of course should do whatever you feel comfortable with, but it is good to stick to a few basics regarding what constitutes a Hanukkiah: you’ll need nine candles/wicks, eight of which are lined up and on the same level, and the 9th should be either higher or lower. This ninth candle, which is called the shamash, can be in the middle or to the left or right of the eight candles. The candles are lit starting from the right hand side, adding one more candle per night. The shamash is lit first, and then the remaining candles are lit.
I did a little search on the internet, and saw a few nice DIY Hanukkiahs that I’m only going to describe, because their photos lead one to believe that the Hanukkiah is just a grouping of nine candles. It’s my job to stick to the real thing, since that is where the true beauty lies, right? That said, you can make a Hanukkiah from painted bottles, shot glasses, jelly jars, bottle caps, or just about anything that can hold candles or olive oil. Got it? (I’m more than happy to answer any questions you may have at [email protected] And of course I’d love to hear from you!)
So I’ll sign off with a fun collection of DIY Hanukkiah ideas, both usuable and not, that I hope you’ll enjoy. And I’ll be back tomorrow with Hanukkah decorations!
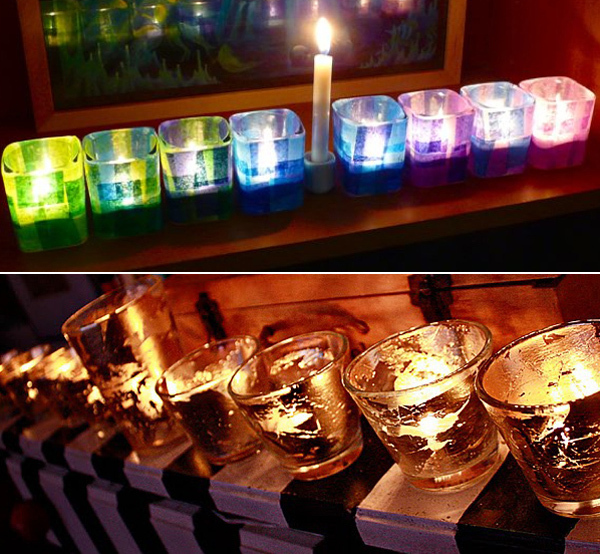
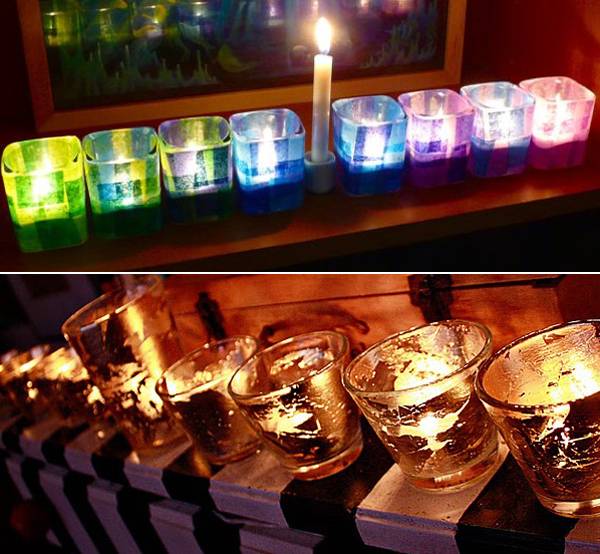 Diane Gilleland of Crafty Pod designed this gorgeous tissue paper decoupage Hanukkiah which is festive and do-able! Aunt Peaches made these gorgeous gold-leaf glasses to use as a Hanukkiah….a very stunning presentation, I’m sure you’ll agree!


Inna from Inna Creations is a talented paper quiller, as well as general crafter. I just love this peacock Hanukkiah that she made from crafting clay, and her quilled paper Hanukkiahs are certainly special, though you may want to ask her where she gets so much patience for her delicate works! You can take a look at her Hanukkah creations here.
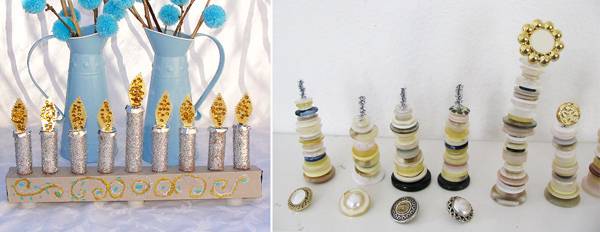 Creative Jewish mom made this glittery Hannukah Menorah with her kids from cardboard tubes and an aluminum foil box among other things…And I just love this button Hanukkiah version by sweet sweet life, based on the tutorial from Robert Mahar over at Junior Society.
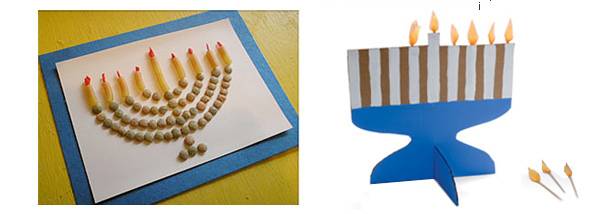
These two projects are meant for kids, but I think their simplicity makes them great for anyone who likes spare design. Plus you could use these ideas and embellish them a bit if your taste runs on the fancier side! The pasta and lentils Hanukkiah is from Kid’s Craft Weekly, while the cardboard Hanukkiah is from Family Fun.
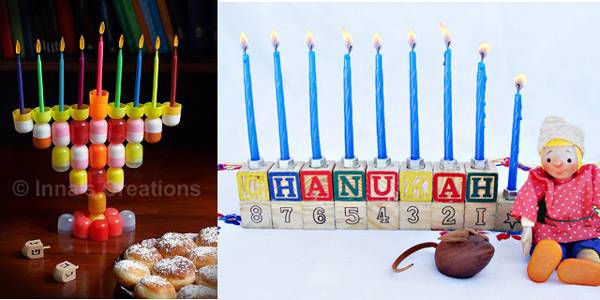
And for a bit of whimsical fun before I say goodbye, I just love what Inna of Inna Creations did with these recycled plastic containers, and Creative Jewish Mom has a simple and sweet idea for making a nostalgic ABC Blocks Hanukkah Menorah that would look great amidst your vintage Americana!
Okay, that’s all for now, whether or not you’re celebrating Hanukkah I’m quite sure you’ve got some things to do! I know I certainly do! All the best, and do visit me at creativejewishmom.com I’d love to meet you!
Hanukah is actually not more correctly spelled Chanukah! (unless you are german-speaking.) using the “ch” to represent a guttural “het” is a holdover from german/yiddish.