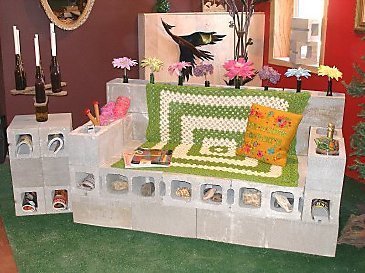
Check out this interesting idea from Michele Beschen over at DIY Network. Thanks, Michele!:

Mother Nature reaches out to us during the summer months with warm, sunny days and a lush landscape, so it’s only natural that we look outdoors to expand our living space at this time of year.
And when it comes to creating outdoor spaces, the sky’s the limit. Setting up and furnishing an outdoor room gives you the perfect opportunity to use your imagination and be a bit more daring and playful than you are indoors.
Seize the opportunity by having a go at creating your own outdoor furnishings. One material that I find to be especially easy to work with, durable and the perfect foundation for a sturdy piece of outdoor furniture is concrete block.
Blocks are readily available at home improvement stores, they’re inexpensive, and their only drawback is that they’re a bit heavy.
The most common type weighs about 40 pounds. You might also be able to find the true “cinder block,” which weighs less because the aggregate used is granulated coal or volcanic cinder instead of sand and gravel.
If you’re up to the workout, these blocks can be configured in a many ways to create sofas, chairs, end tables, ottomans and more!
You can get the blocks in a few different sizes. To build the sofas, chairs and side tables, I use primarily three styles of block: Full blocks with a raw end, full blocks that have a finished end, and half blocks.
Here are the instructions to create your very own concrete sofa:
Choose the location. (This is very important, because you won’t be able to move it very easily once its’ built and secured together with adhesive.)
Make sure that you set it up on a level surface.
Materials:
25 full blocks with a rough end (plain block)
14 full blocks with a finished end, (square corner)
8 half blocks
landscape block adhesive or mortar mix
Steps:
- The base of the sofa will be four full blocks wide, four blocks deep and two blocks high. Position the blocks to create the front row of the base.
- Start with two full raw blocks placed end-to-end, holes facing up, then add a full finished block to either end.
- Butt all blocks together securely as you go. Create the next row, staggering all joints and using half blocks to fill in the ends.
- Continue the base, making sure you have your finished ends facing out around the edge.
- Build the next level, staggering the joints and positioning the holes out this time.
You can use landscape adhesive to secure the base further if you like.
It is not necessary to use adhesive between every block, especially on the base. The most important place for the adhesive is on the arms and the back, because that is where people will be leaning and putting pressure.
- Complete your sofa by adding arms and a back.
The back of the sofa will be two rows high and one row deep.
- Use landscape adhesive to secure the back to the base.
- Position the holes facing up on the back and arms to give you built in places to store things.
- Dress it up with cushions or throws, and add some plants and other decorations. You can give it color by using concrete paints or stains.
- Then, sit back, put your feet up and relax in your newly created sofa, guaranteed to last a lifetime!
You could plasti-dip the rouch edges to add some comfort and splashes of color. I love this idea.