“Mexican food without corn tortillas is like Chinese food without rice…The centrality of corn tortillas in Mexico may come as a surprise…, since many of us north of the border don’t choose corn tortillas with our Mexican food. The reason: We may have never eaten a good fresh one- a just-made one. Corn tortillas…are at their peak for only a few hours after they’re made.” (From Bayless, Rick. Mexico: One Plate at a Time [New York: Scriber Press, 2000], 104)
After checking every Latin-American food market in my neighborhood, I finally located a tortilla press, a tortilladora, at stop number five. The product? Roughly sawn, low-grade pine secured with black drywall screws that stuck out dangerously from the press. And it cost $24 USD. (Although it did come with a cool HECHO EN MEXICO sticker).
As much as I like to support my local Latino markets, I reckoned I could do a bit better for less money. Here’s my effort. Total cost = $10.50 USD. Total effort: 1 hour + glue drying time.
Even if you’re not ambitious enough to make your own press, I and all of Mexico recommend you purchase one and make your own fresh corn tortillas. It’s a basic pleasure that will never allow you to settle for pre-package, yellow, u-boat taco shells again.
Materials and Tools
1” x 10” x 3’ Select Grade Pine Board
1” wood dowel
1/4” Carriage Bolt, 1 3/4” length
1/4” Wingnut
1 1/2” Pin Hinge (x2) and accompanying screws
Saw (Miter Saw, Circular Saw, Large Miter Box, Hacksaw, or traditional cross-cut saw)
Electric Drill and 1/4” drill bit
Wood Clamps
Mineral Oil
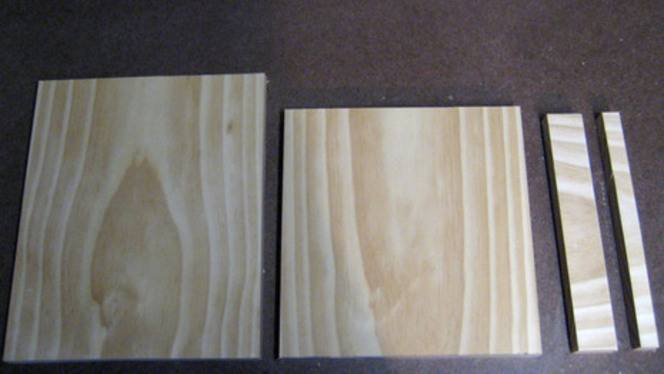
Cut your 1”x10” pine board (which will actually be approximately 9 1/4” in width) to the following lengths: (your nicer lumber yards and hardware stores will do this for you)
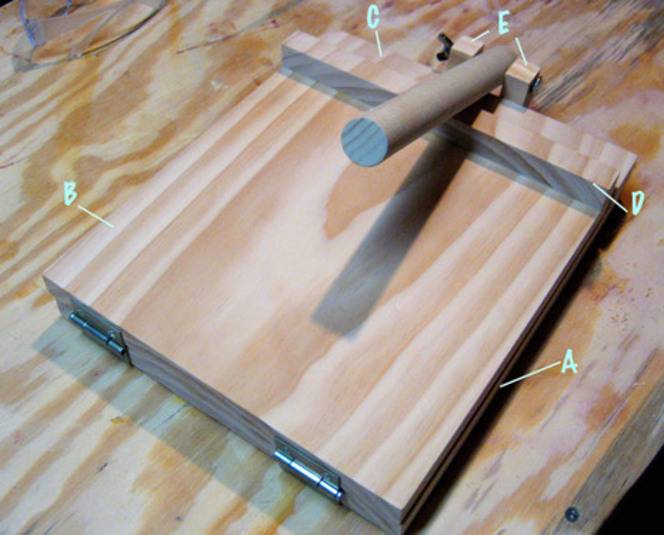
11 1/4 ‘ (A)
9 5/8” (B)
1 1/2” (C)
3/4” (D)
2 1/4” x 1” (x2) (E)
Cut your 1” dowel down to a 9” piece.

Glue and clamp C to A, lining up the edges. This will serve for the base of the press.
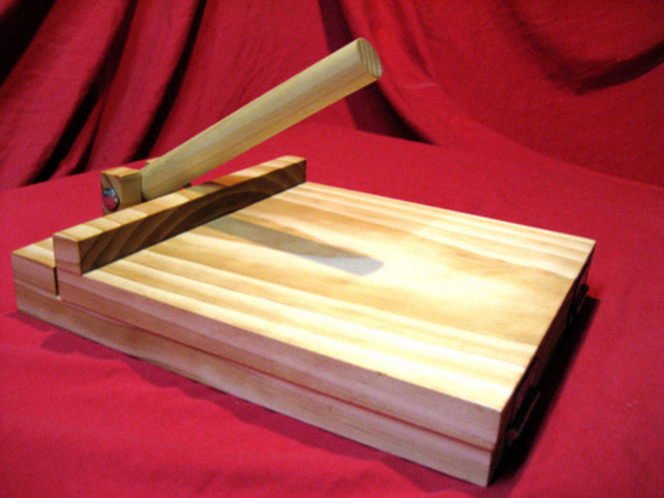
Glue and clamp D to B, lining up the edges. This piece will serve as the top, with the thin piece D interacting with the arm to create squeezing pressure. (See photo.)
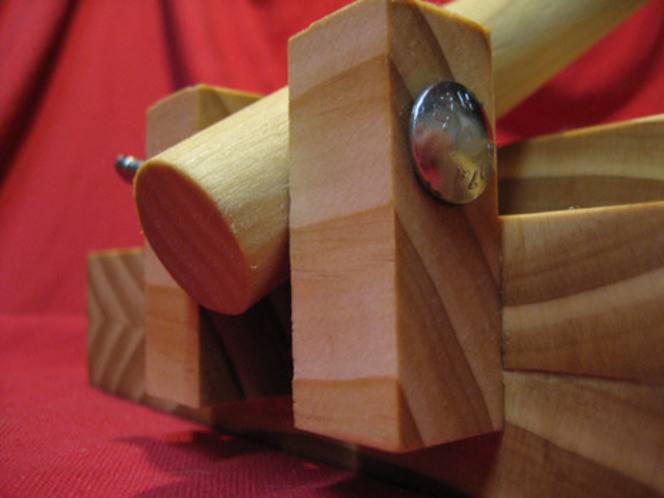
Place the small pieces E on either side on the dowel. It may be helpful to clamp this unit together. Drill a 1/4” hole approximately 3/4” from the top of the E pieces, running the bit through a few times to make the hole slightly large. Insert the bolt and secure with the nut.
Sand each piece with 100, 150, and then 220 grit sandpaper, being careful, as pine is very soft. Rub each piece with a thin coat of mineral oil. Mineral oil is food safe, unlike Danish or Teak oil, and will never go rancid, like olive or vegetable oil. Mineral oil is available at the drug store, and most likely not the hardware store. (It took me 4 trips to figure this out.)
Attach the top and base with the hinges, at the short side (opposite of glued block B and D). Place a piece of thick card, or a thin washer, in between the layers to leave a little bit of space, so your tortillas don’t become too thin.

Glue the arm to the tall side of the base (pieces A and C) so that the dowel hangs over the attached top.

Chris’ Tortilla Recipe:
(If you live in a large city with an extensive Chicano population, you may be able to purchase fresh masa dough, from a well-stocked Latin market or a tortilla factory. By all means, take advantage of your good fortune.)
Mix two cups of Masa Harina (such as the widely available Maseca brand) with 1 1/4 cups hot water and a hefty pinch of salt. Using your hands, mix until soft, like Play-dough, but not sticky like a cookie batter. If necessary, add a little more water or masa flour. Let the dough rest while you preheat a griddle or two skillets, one side/skillet to medium(400Ëš F) and the other to medium low (300Ëš).
Divide the dough into golf-sized balls; there should be 15-17, and cover with a damp cloth.
Cut a large zip-top bag along the sides, and remove the thick zipper, to make a long sheet of thick plastic. Lay the plastic on the bottom of the press, and place one dough ball slightly off-center, towards the hinge. Lay the other half of the plastic on top, and close the lid. Press the handle, forcefully, and form a tortilla 5-6” in diameter.
Open the press, and peel off the top sheet of plastic. Flip the tortilla onto your palm, so the dough is touching your skin, and carefully remove the rest of the plastic. (This will take practice).
At the griddle, drag the tortilla off your hand and let it catch on the cooler surface, and cook for 30 seconds, or until the tortilla comes off easily. The edges may look a little dry, but no worries. Flip it to the hotter surface and cook for 40-60 seconds. You see some steam and the bottom will get brown spots from the larger pieces of corn. Flip and cook for another 40-60 seconds, during which the tortilla will begin to puff.
Once off the heat, stack and store in a towel-lined bowl or basket. This traps the steam, keeping the tortillas most and warm.
Wrap around your filling of choice (hopefully, not ground beef with “taco” seasoning), and enjoy!

Hi, the 1 1/2″ carriage bolt seems too short, so we used a 3″ one.
What size tortillas does this make?
Hi Barbara! The tortillas are about 5-6″ in diameter. Hope that helps and let us know how it goes!